Showing posts with label clothes. Show all posts
Sunday, December 3, 2017
Wednesday, April 29, 2015
Wednesday, April 1, 2015
Tuesday, February 24, 2015
Striped dress for my mom
I made a dress for my mom from some red and black knit fabric I got from Joann's. I used her kurti as a pattern and just lengthened it. For the sleeves, I used a kurti and lengthened it so that I would get long sleeves. Then I just put the pieces together. It was really fast. I think I could have done a better job on the bottom hem, but the neckline came out nice. And I think it looks great on my mom, and she liked it too!
Here's my mom modelling her new dress
Flower pattern shift dress
I made a shift dress! I usually make gathered dresses, so this was a deviation from the usual. I think it came out well. It looks kind of like a kurti. The sleeves are kind of like puffed sleeves but the shoulder seams are a bit too low on my shoulders. I actually drafted a pattern and muslin for the bodice, but I guess need to fix the armhole part. There's a super long zipper in the back. I was planning on maybe doing a peter pan collar if I found some cool leather fabric, but I didn't, so I didn't. And that's about all the interesting things I can think of for this dress. Shift dresses are cool.
This is my "I'm so hip" pose. But at least you can see the dress and sleeves. Oh and the sleeves are actually full length, but I fold them up (I didn't hem them).
Another note: this is another one of the fabrics my dad got from India.
Sunday, January 18, 2015
Pink!
I got some pink knit fabric from JoAnn's and Black Friday and made these:
I learned some stuff from making the shirt. First, that kind of knit fabric is pretty thin and drapey, so the shirt looks more tight-fit than it actually is. Also, I have to make sure not to cut the neck too deep, which I did. Also, the pocket should have been a bit lower.
As for the skirt, I used this tutorial. However, I didn't put the elastic in the waistband, so the skirt is not very tight and tends to sag down, but with a belt it's fine.
I learned some stuff from making the shirt. First, that kind of knit fabric is pretty thin and drapey, so the shirt looks more tight-fit than it actually is. Also, I have to make sure not to cut the neck too deep, which I did. Also, the pocket should have been a bit lower.
As for the skirt, I used this tutorial. However, I didn't put the elastic in the waistband, so the skirt is not very tight and tends to sag down, but with a belt it's fine.
Tuesday, August 26, 2014
Another men's shirt refashion
I had a men's shirt that was slightly too big for me, so here's what I did with it.
1. First I cut off the sleeves and collar.
2. I removed the seam on the back that attaches the top of the shirt to the majority of the back. I also cut along the side seams so that the back was separated from the rest of the shirt.
3. For the sleeves, I cut off the cuff and cut the sleeve along the underarm seam.
4. I attached the sleeves to the back piece (to add more length to the cloth). The cuff side goes on the bottom.
5. I gathered the top part of the back piece + sleeves so that the width matched the back of the shirt that was still attached.
6. I sewed the back piece + sleeves back onto the back.
7. I sewed down the sides.
8. I cut off the bottom so everything was even.
9. I hemmed the neck and sleeves. When hemming the neck, remember that the back is now the front and the front is now the back. When I was hemming the sleeves, I had to adjust things a bit since the armhole was not even, so some parts I had to fold back more than other parts.
10. Hem the bottom
And that's all! Here's how it looks now (I do have to fix it up a bit since I was in a rush when I was making this)
Friday, August 22, 2014
Outfit posts!
Since some of my old pictures (and new ones too for that matter) aren't of great quality, Sneha and I took some more! I updated the individual posts with the pictures, but here are a few extra below.
The updated posts are:
refashioned shorts
patterned skirt
bow belt
elastic waist dress
gathered orange skirt
t-shirt dress
purple dress
beige jacket
If you scroll to the bottom of the posts, you can see the new pictures!
The updated posts are:
refashioned shorts
patterned skirt
bow belt
elastic waist dress
gathered orange skirt
t-shirt dress
purple dress
beige jacket
If you scroll to the bottom of the posts, you can see the new pictures!
Sunday, August 10, 2014
Gold elephant t-shirt and refashioned shorts
I bought a $1 shirt from the flea market and painted an elephant on it with gold fabric paint. I used a "3-dimensional paint" bottle, which means the paint squeezes out of the bottle. This was actually way, way better than using a paint brush. The bottle offers so much control, and it doesn't necessarily have to be 3-d and funky looking if you don't want it to. It's easy to make small, flat strokes, and they come out pretty cleanly.
After painting and letting it dry, I cut off the collar and hemmed it and cut off some of the sleeves and rolled them up. I also made the sleeve holes a bit smaller.
I think the elephant came out well. I couldn't find one that I liked online, so I made a design myself. I like making unique designs. It's really fun. I could do it all day.
The shorts are made from the top half of a maxi skirt. They're not that great, but I can wear them at home. I basically made a slit down the middle and then added a rectangular piece of cloth on the inside to prevent bunching, but next time I should make it wider.
My friend got me that bow belt. It goes well with the shirt!
By the way, here are some more detailed pictures of the sleeves:
First I cut off an inch or two and rolled a hem and secured it.
.JPG)
Then I took in the sleeve a bit (the picture shows the sleeve inside-out)
.JPG)
.JPG)
Here are the shorts in action!
After painting and letting it dry, I cut off the collar and hemmed it and cut off some of the sleeves and rolled them up. I also made the sleeve holes a bit smaller.
I think the elephant came out well. I couldn't find one that I liked online, so I made a design myself. I like making unique designs. It's really fun. I could do it all day.
The shorts are made from the top half of a maxi skirt. They're not that great, but I can wear them at home. I basically made a slit down the middle and then added a rectangular piece of cloth on the inside to prevent bunching, but next time I should make it wider.
My friend got me that bow belt. It goes well with the shirt!
By the way, here are some more detailed pictures of the sleeves:
First I cut off an inch or two and rolled a hem and secured it.
Then I took in the sleeve a bit (the picture shows the sleeve inside-out)
Here are the shorts in action!
Tuesday, August 5, 2014
Long skirt to shorter skirt
I had a long skirt. I made it shorter. Here's how I did it: Actually I wanted to make shorts and a skirt from it. The top was going to be shorts, so I cut off the bottom for the skirt. Then I made a "waistband" by hemming the top and strung some elastic through it. Then I added pockets.
Had a skirt
Cut the skirt
Made new skirt!
More pictures!
Friday, August 1, 2014
Shorts
I looked at these tutorials on Cotton+Curls and a pair & a spare for ideas, and pretty much did the same thing as a pair & a spare. I traced my old P.E. shorts approximately onto some fabric. I made 2 unecessary cuts because I glossed over the tutorial (since I had used it before), but don't worry I didn't totally screw up.
I sewed the pieces together and made a hem at the top with a little opening to string the elastic through. The elastic should be long enough to fit snugly at your waist/hips/wherever your pants end. Then I sewed the elastic ends shut. Then I hemmed the bottoms. Then I put on the shorts. And I marveled at how hideous they looked. Then I wore them the next day. And they didn't look so hideous. So I was not utterly disappointed.
Monday, July 21, 2014
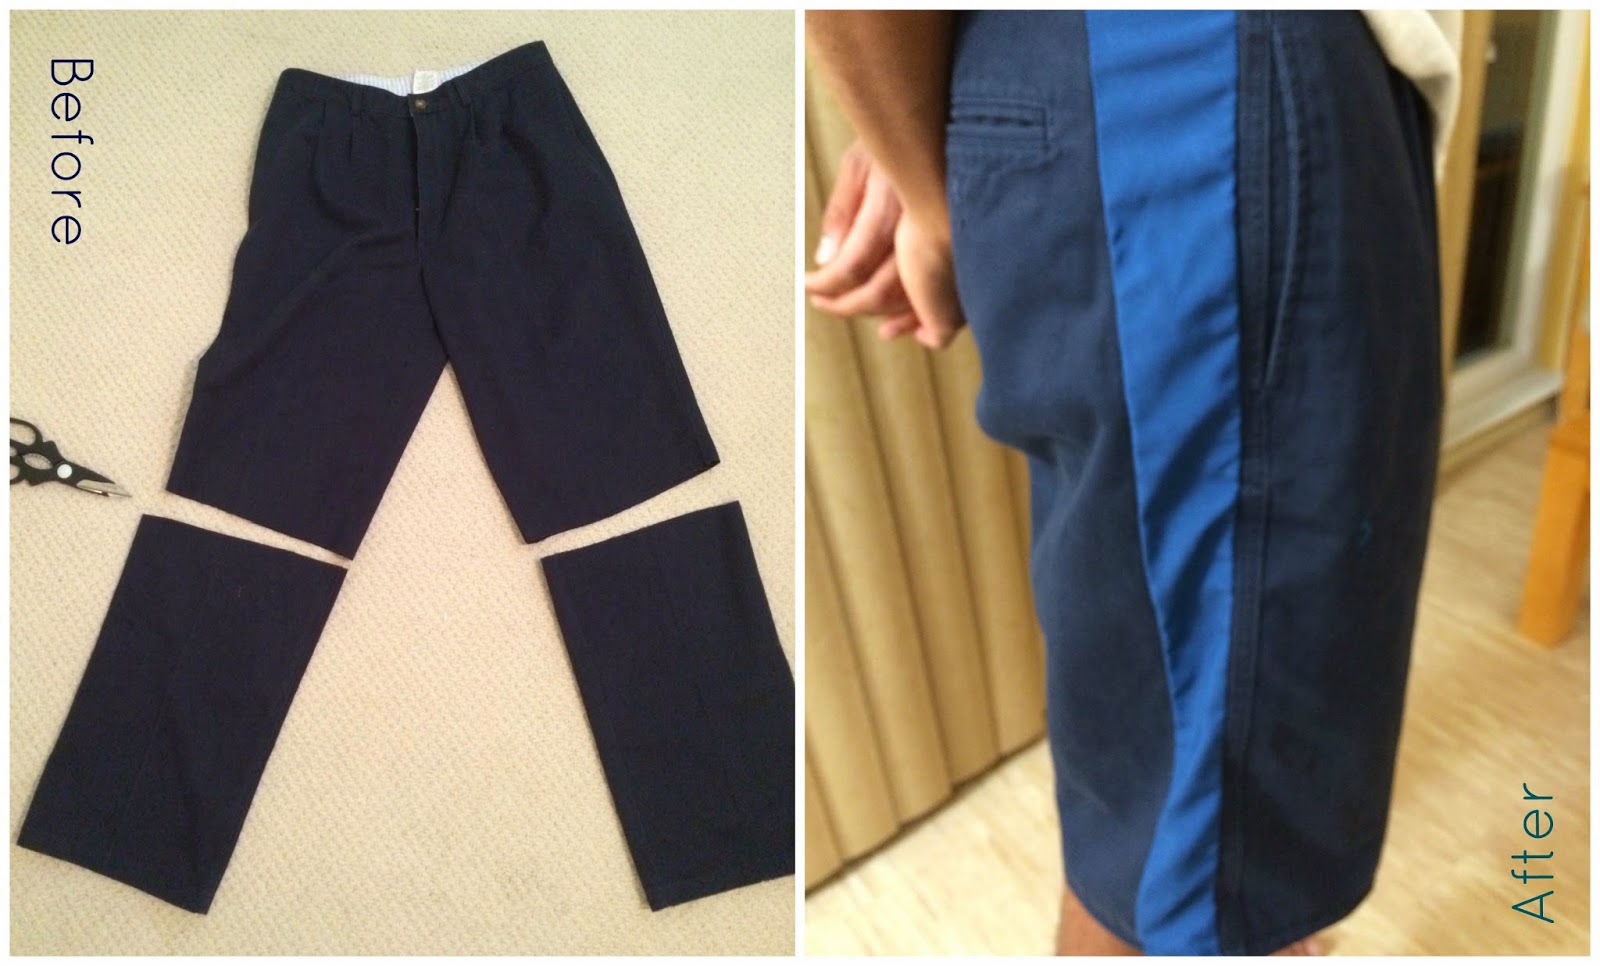
Refashion Brofashion - men's pants into shorts
What to do when your pants are too short and tight? Turn them into shorts!
Here is a not-very-thorough step by step guide.
First, cut off the pants an inch or two longer than you want them to be.
Then cut two strip of different fabric the length of your shorts and whatever width you want, depending on how tight the shorts are. You can compare your tight pants to a pair that fits well to see how much extra fabric you'll need. Remember to distribute the extra fabric between the two sides.
Then, cut alongside one outer edge. I had very little room to cut, so the seam allowances had to be pretty small.
Sew the fabric strip to the shorts. (right sides together; I used the shiny part as the "wrong" side because it was too shiny for real life). Also before you sew the fabric to the shirts, you can hem one side so that the top will be cleaner. We'll hem the bottom later.
Another picture for your enjoyment.
Hem the bottom (fold it up twice and sew).
You may want to double stitch (or serge or whatever) so that the shorts won't break when you do fun activities like yoga (see example of intact shorts during activity above).
The finished product!
Oh yeah, the title says "Brofashion" because it's my brother. GET IT?
Sunday, June 22, 2014
Subscribe to:
Posts (Atom)
.jpg)